As an Amazon Associate, I earn from qualifying purchases. Some links in this article are affiliate links, if you buy through them I may earn a small commission at no extra cost to you.
Quick Summary
- Hydroponic Media: Grow microgreens on hemp mats, coco coir or paper towels for clean harvesting.
- Seeding Density: Scatter seeds densely and evenly across the damp grow mat.
- Blackout Phase: Stack empty trays on top of seeds for 3–4 days to force strong, vertical stem stretch.
- Bottom Watering: Water from below to prevent mold, damping off and messy foliage.
- Lighting & Harvest: Expose to bright light once stems stretch, harvesting in 7–14 days with scissors.
Growing microgreens without soil utilizes moisture-retentive, sterile media like hemp mats, coco coir, or jute pads to produce clean indoor crops without soil grit or fungus gnats. These hydroponic methods streamline harvesting, reduce washing time, and maximize space on countertops or grow racks.
Why Grow Microgreens Without Soil?
Eliminating soil removes the primary vector for fungal gnats and messy runoff in indoor growing spaces. Soil-free pads wick moisture evenly and can be cut cleanly at table height in seconds. If you are comparing indoor hydroponic methods, our complete guide to hydroponics for beginners covers foundational system types and water handling.
Key operational advantages include:
- Clean Harvests: No soil splashing onto delicate stems, eliminating grit in the finished crop.
- Pest Elimination: Soil harbors fungus gnat eggs and fungal pathogens; sterile media keep nursery spaces clean.
- Minimal Footprint: Standard 10x20 shallow trays fit easily on windowsills, kitchen counters, or vertical wire shelving.
- Rapid Turnaround: Harvesting involves a single scissors cut just above the mat surface, requiring minimal washing.
Essential Supplies for Soil-Free Growing
Gather these materials before seeding your first tray:
- Shallow Trays: Use shallow 10x20 nursery traysView on Amazon (one slotted tray nested inside a solid reservoir tray).
- Soilless Media Options:
- Coco coirView on Amazon: Highly moisture-retentive; ideal for large-seeded crops like sunflowers and pea shoots.
- Jute padsView on Amazon: Compostable, organic fiber pads that provide reliable capillary wicking.
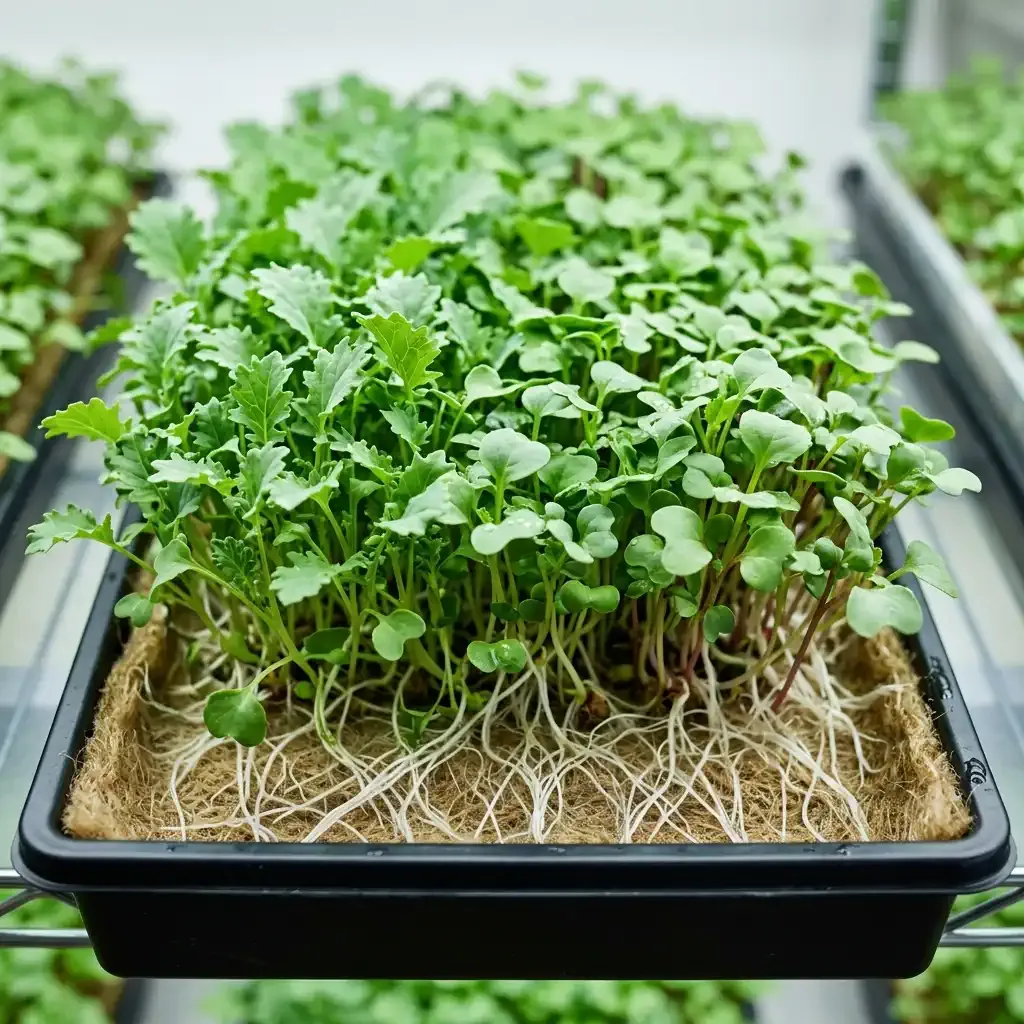
- Hemp grow matsView on Amazon: Sterile, tightly woven mats that provide clean root anchorage without loose fibers.
- Filtered Water: Clean, chlorine-free water balanced to pH 6.0.
- Lighting: Provide 12–16 hours of daily illumination using natural window exposure or a dedicated LED grow light.
- Quality Seeds: Untreated seeds tested for microgreen densityView on Amazon, such as broccoli, radish, or speckled peas.
- Spray Bottle: Delivers gentle misting during early seed cracking.
Step-by-Step Growing Workflow
1. Moisten the Medium
Place your chosen mat or coir into the slotted tray. Moisten thoroughly with clean water (about 1.5 to 2 cups for a standard 10x20 tray).
Moisture Test: Press firmly on the pad. It should feel saturated like a wrung-out sponge, releasing only 1 to 2 drops of water under moderate pressure without pooling free liquid in the tray corners.
2. Broadcast the Seeds
Scatter seeds evenly across the entire surface of the damp medium. Aim for dense, uniform coverage without piling seeds on top of one another. Gently tamp seeds down using a clean board so they make firm physical contact with the damp fibers.
3. Weighted Blackout Phase
Stack a second solid tray directly on top of the sown seeds. Place a 3-to-5-pound weight (such as a brick or paver) inside the top tray. This top-down pressure replicates the physical resistance of topsoil, forcing seedlings to anchor taproots deeply into the mat and produce thick, sturdy stems. Keep stacked in the dark for 3–4 days, misting once daily if dry air is present.
4. Light Exposure and Greening
By day 3 or 4, expanding shoots will begin pushing the weighted tray upward. Seedlings will appear pale yellow and compressed. Remove the top tray and place the tray under full-spectrum lighting. Within 24 hours of light exposure, chlorophyll synthesis turns the stems and cotyledons deep green.
5. Transition to Bottom Watering
Stop overhead misting once trays enter the light. Surface misting traps water within the dense leafy canopy, creating stagnant conditions that trigger fungal damping-off.
Switch exclusively to bottom watering: lift the upper slotted tray and pour half an inch of water into the lower reservoir pan. The grow mat wicks moisture upward from the base, keeping upper stems and leaves dry.
6. Harvesting
When microgreens stand 1.5 to 2 inches tall with fully opened cotyledons (typically 7–14 days depending on variety), harvest the tray. Use sharp kitchen shears or a clean harvest knife to slice clusters just above the mat collar.
Recommended Varieties for Soil-Free Trays
- Radish: Sharp peppery flavor, rapid 7-day turnaround, and thick, easy-to-cut stems.
- Broccoli: Mild brassica flavor, high sulforaphane density, and dependable emergence.
- Pea Shoots: Sturdy, sweet shoots with tendrils that hold well in cooking.
- Sunflower: Nutty, crisp shoots that form a substantial salad base.
- Mustard: Pungent, spicy kick that adds heat to dressings and wraps.
For a comprehensive nutritional and culinary breakdown of varieties, see our guide to 25 microgreens with incredible health benefits.
Troubleshooting Common Issues
- Canopy Mold: Increase room air circulation using a small fan and switch immediately to bottom watering.
- Stretched, Weak Stems: Lower grow lights closer to the canopy (6–12 inches above the leaves).
- Uneven Germination: Maintain room temperatures between 18°C and 24°C (65°F–75°F) and confirm the weighted tray makes uniform contact across the mat.
Starting Your First Tray
Begin with fast-germinating varieties like broccoli or radish. Both establish sturdy taproots quickly, tolerate dense sowing, and produce tender shoots within 7–10 days. Staggering two 10x20 trays a week apart ensures a steady supply of fresh, homegrown greens for salads and sandwiches.
Editor’s Note: Parts of this guide were structured and optimized with the assistance of AI, then thoroughly reviewed, edited and expanded with first-hand growing experience by our author Raymond to ensure practical, real-world accuracy.
Frequently Asked Questions
Why do we stack trays during the microgreen blackout phase?
Stacking trays applies light pressure that helps seeds root deeply and forces the stems to stretch upward, producing longer and cleaner stems for easier harvesting.
How do I water microgreens without soil?
Use bottom watering by pouring water into the bottom tray; the grow mat will wick up the moisture, keeping the leaves dry and preventing mold.
Do microgreens need soil to grow?
No. You can grow microgreens on coconut coir, jute mats or hydroponic pads.
How long does it take to grow microgreens without soil?
Microgreens are harvest-ready in 7–14 days, depending on the variety.
Can I reuse the growing medium?
Some, like hydroponic pads, are reusable with proper cleaning. Organic mats like jute and coconut coir are single-use but fully compostable.
Our Amazon Storefront
Browse all our recommended tools & supplies
Everything we personally use and trust, hand-picked for gardeners like you.
I've been running DWC and Kratky systems for several years and write about what actually works, not textbook theory. Follow along for honest product reviews, practical guides and real grow results.