As an Amazon Associate, I earn from qualifying purchases. Some links in this article are affiliate links, if you buy through them I may earn a small commission at no extra cost to you.
Quick Summary
- Soil-Free Basics: Learn how hydroponics feeds plants directly using mineral-rich water solutions.
- Key Benefits: Save up to 90% more water and grow crops 30-50% faster than in-ground gardening.
- System Varieties: Understand the difference between DWC, Kratky, NFT, Ebb & Flow, and Drip setups.
- Reservoir Control: Monitor pH (5.5-6.5) and EC (nutrient concentration) daily for optimal plant uptake.
- Lighting Strategy: Provide 14-16 hours of daily grow light exposure for indoor crops.
I didn’t plan on becoming a hydroponics person. I’d been killing houseplants for years, so when a friend suggested growing food without soil, my first reaction was something like “that sounds like a lot more ways to fail.” But I tried it anyway, a mason jar, some lettuce seeds, and a nutrient solution I definitely mixed wrong the first time. That was six years ago.
If you’re curious about hydroponics but not sure where to start, this is the guide I wish I’d had. We’ll cover three beginner systems, what to watch out for with each one, the equipment you actually need, and how to keep things running without drama. It’s simpler than it looks.
What is Hydroponics?
Alright, so hydroponics sounds fancy, but at its core, it’s just gardening without soil. In hydroponics, plants grow directly in water mixed with nutrients instead of soil. This means you can set up your garden indoors or even in places where traditional gardening would be tough, like a small apartment.
There are a few different hydroponic systems, but let’s start with the basics. One of the simplest is the Kratky Method. Picture this: you have a container of water with nutrients mixed in, and your plant is suspended above it. As it drinks up the water, it creates an air gap, letting the roots breathe. This method doesn’t need pumps or electricity, making it perfect for beginners. Now, I tried this with lettuce once, and let’s say my first attempt was…a lesson. I added way too much nutrient mix, thinking, “More food equals bigger plants, right?” Well, my poor lettuce looked like it had been on a week-long sugar high. Lesson learned, follow the instructions on the bottle!
The one thing to watch with Kratky: don’t let the reservoir run dry. Once roots dry out, the plant goes fast and there’s no early warning sign. Top it up before it’s more than two-thirds consumed.

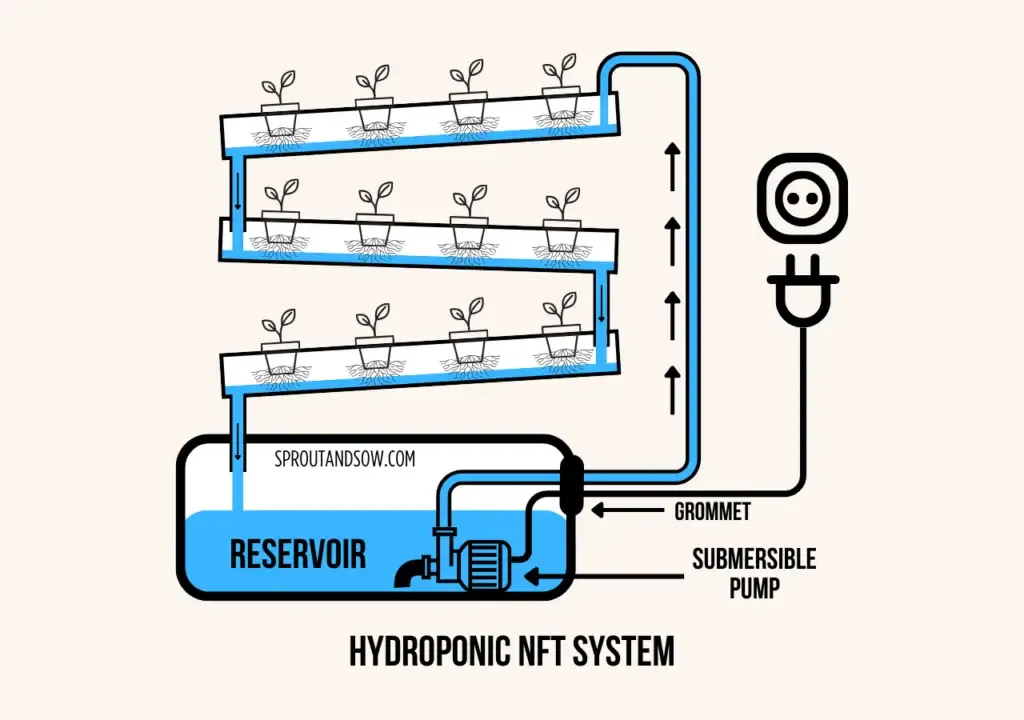
For a bit more complexity, there’s the Nutrient Film Technique (NFT). This setup has a thin layer of water (the “film”) constantly flowing over the plant roots. The trick here is that roots get both nutrients from the water and oxygen from the air. You need a small pump for this, so it’s a bit more technical, but it’s still beginner-friendly. Honestly, I tried this with herbs like basil, and it was amazing how quickly they grew. Plus, it was kind of mesmerizing to watch.
The pump is the weak point in an NFT system. If it fails, roots dry out within hours. Anyone setting up NFT should keep a spare pump on hand, it’s cheap insurance.
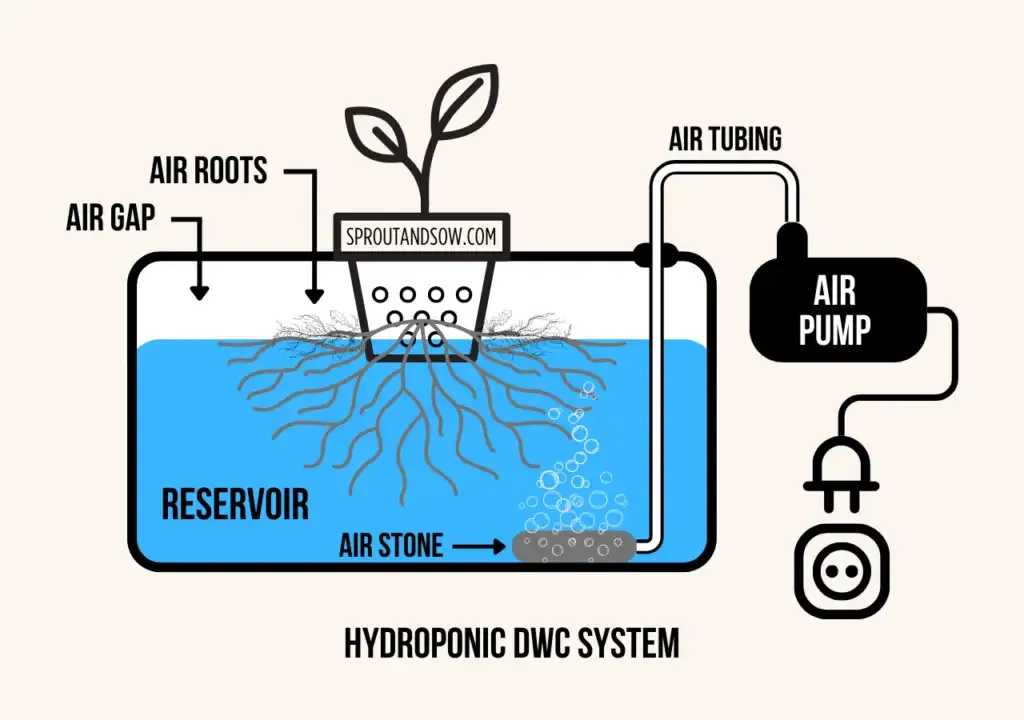
Lastly, there’s the Deep Water Culture (DWC) system. Imagine your plants floating on a raft, with roots hanging down into water that’s being bubbled with air. This setup is a bit more of an investment since it needs an air pump to keep things oxygenated, but for plants like tomatoes, it’s a game-changer.
The risk with DWC is root rot, roots are submerged constantly, so if oxygen levels drop or water temperature climbs above 75°F (24°C), you’ll see brown, mushy roots fast. An air pump and an aquarium thermometer are non-negotiable here.
The beauty of hydroponics is that there’s a system for everyone. Whether you’re a tech wizard or just want something low-maintenance, there’s a setup that’ll work for you.
Benefits of Hydroponic Gardening
You know, one of the biggest perks of hydroponic gardening is the speed. Plants grow like they’re on fast-forward. I’m talking 30–50% faster than traditional soil gardening, which blew my mind the first time I tried it. One week, I’m putting tiny basil seedlings in my nutrient solution, and the next, I’ve got leaves big enough to make pesto. It’s seriously satisfying, especially if you’re impatient like me.
The reason is straightforward: in soil, plants spend energy pushing roots outward in search of nutrients. In hydroponics, nutrients arrive at the root zone directly, so that energy goes into upward growth instead. A controlled study comparing Swiss chard grown in soil versus hydroponics found a measurably higher relative growth rate in the hydroponic group under identical light conditions, researchers attributed it to direct nutrient availability and reduced root stress.
Another great benefit is the water savings. Because hydroponics recirculates water, you can save up to 90% compared to soil gardening, a figure corroborated by UC Davis research on water use efficiency and a peer-reviewed study by Barbosa et al. (2015) in the International Journal of Environmental Research and Public Health, which found a 12.5× reduction in water use per kilogram of lettuce produced compared to conventional field farming. So, if you’re in a place where water conservation matters (or you just want to keep your water bill low), hydroponics is a great option. Plus, because you’re growing indoors, you’re way less likely to deal with pests or weeds. I used to battle aphids constantly in my outdoor garden, but with my indoor setup, I haven’t had to worry about them at all.
And then, of course, there’s the space efficiency. I live in a pretty small place, so the fact that I can grow vertically is a lifesaver. You can even stack hydroponic systems to make the most out of a small area, which is something you just can’t do with regular soil gardening.
Choosing the Right System for Beginners
System Comparison Dashboard
Choose the right system based on your budget, space limits, and crop goals.
| System | Cost | Maint. | Oxygen Source | Best For | Primary Risk |
|---|---|---|---|---|---|
| Kratky Method | $ | Very Low | Passive air gap (roots hang in air space above nutrient solution) | Herbs, lettuce, small indoor spaces, first-time growers | Silent dry-out. If the reservoir runs completely dry, roots desiccate and the plant dies quickly without warning. |
| Nutrient Film Technique (NFT) | $$ | Medium | Flowing film (roots receive constant flow of shallow, aerated water) | Continuous leafy green production, growers with moderate space | Pump failure or channel clog. If the pump stops or channels get blocked by roots, crops can dry out and be lost in hours. |
| Deep Water Culture (DWC) | $$ | Medium | Active aeration (roots sit in solution oxygenated by an air pump) | Fruiting plants (tomatoes, peppers), larger setups, active monitors | Root rot. Roots are submerged constantly; if oxygen drops or water temperatures exceed 75°F (24°C), fungal rot sets in fast. |
Passive air gap (roots hang in air space above nutrient solution)
Herbs, lettuce, small indoor spaces, first-time growers
Silent dry-out. If the reservoir runs completely dry, roots desiccate and the plant dies quickly without warning.
Flowing film (roots receive constant flow of shallow, aerated water)
Continuous leafy green production, growers with moderate space
Pump failure or channel clog. If the pump stops or channels get blocked by roots, crops can dry out and be lost in hours.
Active aeration (roots sit in solution oxygenated by an air pump)
Fruiting plants (tomatoes, peppers), larger setups, active monitors
Root rot. Roots are submerged constantly; if oxygen drops or water temperatures exceed 75°F (24°C), fungal rot sets in fast.
Quick decision guide:
- Limited space, no pump budget, growing herbs or lettuce → Kratky
- Continuous greens, moderate space → NFT
- Fruiting plants (tomatoes, peppers), willing to monitor closely → DWC
If you’re genuinely unsure, start with Kratky. You can always scale up once you know what you’re doing.
Choosing Seeds for Hydroponics
Leafy greens like lettuce, spinach, and Swiss chard are some of the easiest and most rewarding to start with, they grow quickly and have shallow root systems, so they don’t need a ton of room. Bibb, butter crunch, and romaine can be harvest-ready in as little as 30 days in a hydroponic system, roughly half the time of a soil grow. Herbs like basil, mint, and cilantro are also great choices and tend to thrive in nutrient-rich water, basil in particular sees up to a 25% faster growth rate indoors compared to soil. Just keep in mind, some herbs like dill and oregano can grow tall or spread out quickly, so be ready to give them a bit of space.

Certified Organic Herb Seeds
Basil, Cilantro, Oregano, Thyme, Parsley, Lavender, Chives, Sage, Dill Seeds for Indoor & Outdoor Planting. 10-Pack.
If you’re feeling adventurous, you can even try fruiting plants like cherry tomatoes or strawberries, but these do require more light and nutrients. When I first started with tomatoes, I quickly realized they needed more space than I expected and they will also need some sort of trussing to support the plant when it starts bearing fruit as it can become quite heavy, so if you go for fruiting plants, be sure to have a larger setup or a plan for supporting them as they grow.
Essential Equipment and Supplies
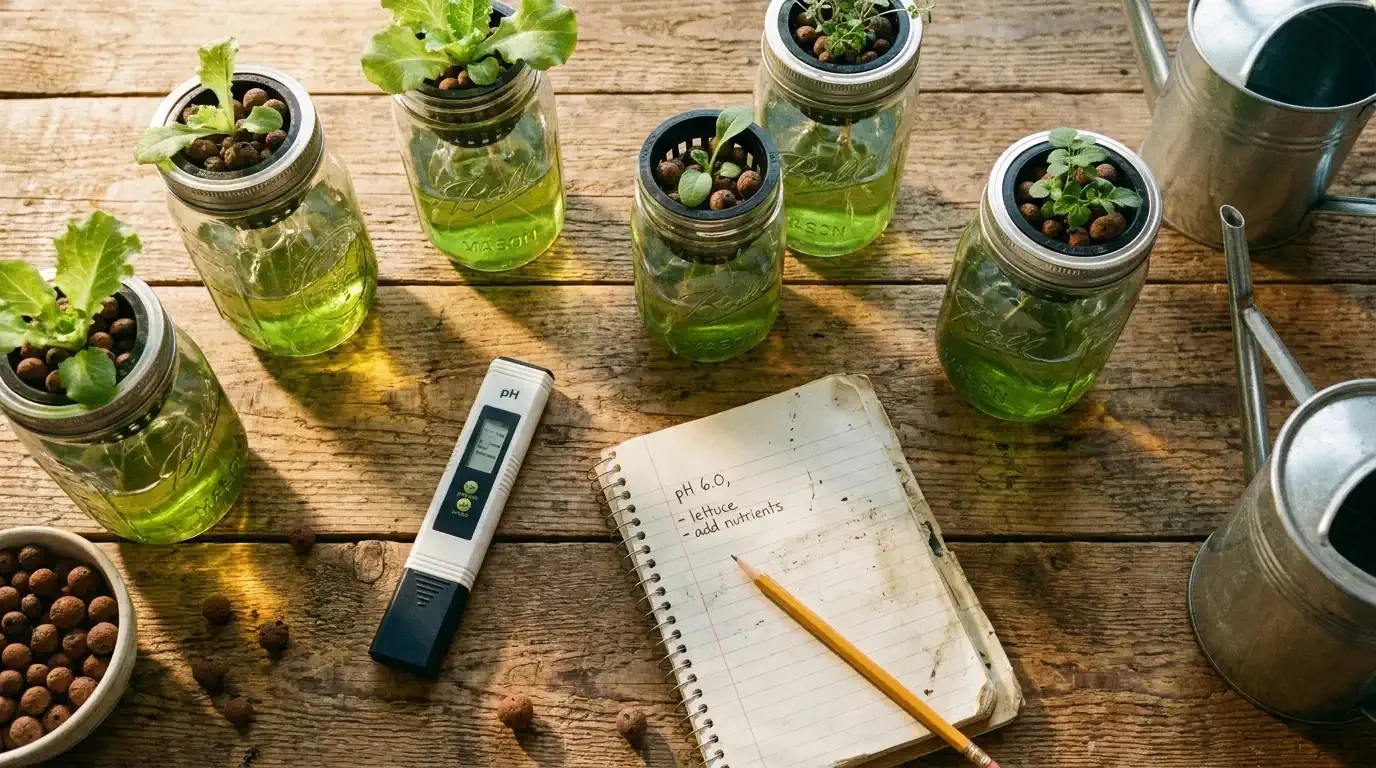
Let’s talk gear. At the very least, you’re going to need some basic equipment: a container, a nutrient solution, grow lights (if you’re not near a sunny window), and a pH meter. I’ll be honest; when I first started, I skimped on the pH meter, thinking I didn’t really need it. Big mistake. Without proper pH, plants can’t take in nutrients effectively, so a meter really is essential.
To get your seeds started, pick up a starter seed tray View on Amazon , germination rates are noticeably better than trying to start seeds directly in the system.
For lighting, check out our beginner’s guide to the best LED grow lights — they are a solid, energy-efficient investment. I keep mine on a timer, which saves me from forgetting to turn them on or off. And trust me, plants need that consistency to thrive.
For nutrients, start with a basic hydroponic nutrient mix. It’s got all the essentials like nitrogen, phosphorus, and potassium, plus the little extras like calcium and magnesium. Just follow the instructions, don’t go overboard like I did in the beginning, or you’ll end up with nutrient burn.
For growing medium, you’ve got three main options:
- Coco coir (coconut husk fibres): naturally pathogen-free, retains water well, and forgiving if you miss a watering. Soak it for 24 hours before use. A 70/30 coco-to-perlite blend is a solid choice for most setups, the perlite adds aeration. This is what I use.
- Rockwool (melted basalt spun into fibres): excellent water retention, widely used commercially. The catch: it naturally sits at alkaline pH, so you need to soak and pH-adjust it before use. Also not biodegradable.
- LECA (expanded clay pellets): reusable, pH-neutral, drains well, and very forgiving for beginners who tend to overwater. More expensive upfront, but it pays back over multiple grows.
Related: 10 Must-Have Tools for a Successful Hydroponic Garden — A breakdown of the net pots, air stones, and timers that make running your system day-to-day much easier.
A Note on Tap Water
Most tap water works fine for hydroponics, but there are two things worth checking before you start.
Chlorine vs. chloramine. Many municipalities treat tap water with chlorine, which dissipates on its own, just leave water uncovered for 48 hours (an airstone speeds this up). Some water systems use chloramine instead, which doesn’t evaporate. Check your municipality’s annual water quality report (most publish it online) to find out which one you’re dealing with. If it’s chloramine, you’ll need a dedicated dechlorinator or a carbon filter.
Hardness and TDS. Very hard tap water can cause pH drift and interfere with your nutrient solution. If you’re in a high-TDS area and having unexplained pH problems, filtered or RO water will make your life easier.
The good news: if you’re on normal municipal water using chlorine, a 48-hour sit in an open container before mixing nutrients is all you need.
Setting Up Your First Hydroponic Garden
Alright, here’s where the fun really starts, getting everything up and running! You’ve got your equipment and chosen a system, so now let’s get those plants growing. First, pick a good spot in your home. Ideally, it’s near a power outlet, especially if you’re running a pump or lights. I made the mistake of setting mine up in a spot with no outlets nearby, and you better believe I was scrambling for an extension cord. It’s the little things you don’t think about until you’re knee-deep in nutrient solution, trust me.
Start by filling your container with water. Depending on your system, you might have different water levels, in the Kratky method, you’ll leave some space for an air gap, while in DWC, you’ll keep roots fully submerged but make sure they’re getting oxygen from an air pump. Mix in your nutrient solution according to the label instructions, and here’s a tip: less is more when it comes to nutrients. The first time I set up my system, I was all excited and thought, “Hey, my plants deserve a little extra!” Bad idea. Overfeeding leads to nutrient burn, which basically turns your plant leaves crispy. Stick with the recommended dosage; your plants will thank you.
Next up is pH. I know, it sounds like chemistry class, but it’s actually pretty straightforward. Plants absorb nutrients best when the pH is between 5.5 and 6.5. Here’s what actually happens when pH drifts outside that range: certain minerals become chemically unavailable to the plant even if they’re dissolved in the water. Iron and zinc become harder to absorb above pH 6.5; calcium and magnesium drop out below 5.5. The nutrients are there, the plant just can’t access them. This is nutrient lockout, and it’s why a perfectly-formulated solution can still produce yellow, deficient plants if pH isn’t dialled in. Oklahoma State University’s extension service has a solid guide on EC and pH for hydroponics if you want to go deeper. Just use a pH down or up solution to adjust, and check every few days, as plants absorb nutrients, the pH will drift.
Lastly, set up your lights if you’re indoors. I recommend LED grow lights, they’re efficient and not as hot, so you won’t cook your plants. Light duration matters more than most people realise:
- Leafy greens (lettuce, spinach, kale): 12–16 hours/day. These are low-light plants, ideal for beginners.
- Fruiting plants (tomatoes, peppers): 16–18 hours during vegetative growth; red spectrum (620–660 nm) promotes flowering and fruiting.
Height matters too. Keep lights 18–24 inches above seedlings, and 12–18 inches above mature leafy plants. Too close causes bleaching or leaf curl; too far and plants get leggy and stretched.
Related: Understanding Hydroponic pH Levels and How to Manage Them — A deep dive into adjusting your pH balance and recognizing early signs of nutrient lockout.
Nutrient Solutions: Feeding Your Plants Right
Now, let’s talk plant food! Nutrient solutions are like the magic potion of hydroponics, but they’re also a little tricky if you’re new to this. Basically, these solutions have the big three nutrients: nitrogen (N), phosphorus (P), and potassium (K), plus a bunch of secondary nutrients like calcium, magnesium, and sulfur. If this sounds a bit overwhelming, don’t stress! Most ready-made mixes are designed to take the guesswork out — check out our guide to choosing the best hydroponic nutrients for your specific crop. Just follow the instructions and you’ll be good to go.
When I first started, I figured, “Hey, maybe plants need some variety, too!” So, I tried mixing different brands. Bad idea. My poor plants were so confused (and so was I). Stick to one nutrient solution brand at a time, especially when you’re new to this. It keeps things simple and consistent.
Here’s a tip: once you’ve mixed your nutrients, check the Electrical Conductivity (EC) or Total Dissolved Solids (TDS) levels with a meter to make sure the concentration is in the right range. These meters measure how much nutrient is in your water, so it’s a good way to avoid overdoing it.
| Plant | Target EC (mS/cm) | Target pH |
|---|---|---|
| Lettuce | 0.8–1.2 | 5.5–6.0 |
| Leafy greens | 1.2–2.0 | 5.5–6.5 |
| Tomatoes / peppers | 2.0–3.5 | 5.5–6.5 |
One practical tip: if your lettuce has brown, crispy edges (tip burn), check EC before adjusting anything else. If it’s above 1.2 mS/cm, dilute with plain pH-adjusted water. Tip burn in lettuce is almost always high EC, not a calcium deficiency.
Finally, check the pH of your nutrient solution every few days. As plants absorb nutrients, the pH level can shift, which affects how much they’re able to absorb. The first time I set up my system, I didn’t realize I needed to keep checking pH, and my plants ended up with nutrient deficiencies. Lesson learned!
Daily Care and Maintenance Tips
Hydroponics is pretty hands-off once you get everything set up, but there are still a few daily checks you’ll want to get in the habit of doing. I like to think of it as giving my plants a quick check-up each day, just to make sure nothing’s going off the rails.
First, check the water level. Plants drink more water than you’d think, especially as they get bigger. My lettuce once sucked up half the water in the container practically overnight! If the water level gets too low, the roots might dry out, and that’s a problem. Just top it up with plain water if it’s low.
Next, keep an eye out for algae. Algae loves light and nutrient-rich water, so it can grow in your system if you’re not careful. I had a mini algae explosion once because I left my water reservoir exposed to sunlight. Here’s why it’s more than a cosmetic problem: algae can reduce dissolved oxygen in your nutrient solution by up to 60% during daylight hours, seriously impacting root health even when everything else in your setup is right. Even clear tubing is enough to trigger growth. The fix is light exclusion, opaque containers, covered reservoirs, no exposed water near a window. If you do get some, clean it out completely and cover any light leaks.
And don’t forget about pH! I can’t stress this enough. A quick pH check every day or two keeps your plants from getting sick. If the pH is off, they might not be able to absorb nutrients, even if everything else is perfect.
Related: Common Hydroponic Pests and How to Manage Them — How to spot, prevent, and treat indoor intruders like aphids, fungus gnats, and spider mites.
Growing Different Plants
Starting with the right plants is half the battle. I learned the hard way when I tried tomatoes as my very first hydroponic crop. Those guys are hungry! They need more light, more nutrients, and more space than most beginner setups can handle. I quickly switched to lettuce and herbs, and it was smooth sailing after that.
Lettuce View on Amazon , basil, and spinach are perfect for beginners because they don’t need a lot of fussing. Lettuce, especially, is like the golden child of hydroponics, it grows fast, doesn’t need crazy amounts of light, and is pretty forgiving. Bibb, butter crunch, and romaine can be harvest-ready in as little as 30 days, compared to around 60 days in soil. Plus, you can harvest it “cut and come again” style, which means you just trim the leaves you need, and it keeps growing back.
Herbs like basil, mint, and cilantro also do great. Just a heads-up, though, basil grows like a weed in hydroponics. I had basil taking over my kitchen at one point because I couldn’t keep up with harvesting it!
Cost of Starting a Hydroponic Garden
Let’s talk about the nitty-gritty: how much it costs to build the cheapest hydroponic system from scratch. I won’t lie, hydroponics can be a bit pricey upfront, but it doesn’t have to break the bank. A basic Kratky setup can cost as little as $10–20 if you’re using containers and jars you already have. A more complex setup like Deep Water Culture with an air pump and grow lights might run closer to $100 or so for a small system.
Now, there are fancier kits out there that cost a few hundred bucks, but if you’re just starting, I’d recommend going basic and then upgrading as you get the hang of it. You don’t need the latest and greatest gear to grow awesome veggies and herbs.
In terms of ongoing costs, nutrients and electricity for the lights are the main ones. Nutrients usually run about $10–15 for a month’s supply, depending on your setup and plant load. As for electricity, LED grow lights are pretty efficient, so they won’t make a huge dent in your bill.
Common Challenges and How to Overcome Them
Hydroponics isn’t all sunshine and roses, sometimes, things go wrong. One of the biggest challenges I faced was nutrient deficiencies. I remember seeing yellow spots on my basil leaves and freaking out, thinking I was doing everything wrong. Turns out, it was just a potassium deficiency. A quick tweak to the nutrient mix, and it was back to healthy in no time.
Another common issue is root rot, which happens if there’s not enough oxygen in the water. You can read our detailed guide on the importance of air pumping and aeration for roots to understand why keeping the water oxygenated is so vital. Root rot is almost always triggered by water temperature above 75°F (24°C) or insufficient dissolved oxygen, so temperature matters as much as aeration. Healthy roots should be bright white or pale cream. Brown, mushy, foul-smelling roots mean rot has set in. The honest truth: prevention is the only reliable strategy. Once it’s advanced, it’s usually faster to discard the plant and sterilise the system than to try to rescue it. Keep your nutrient solution at 65–70°F and make sure your air pump is running. An aquarium thermometer is all the monitoring equipment you need.
Lastly, pH problems can be sneaky. Even if you’re diligent about checking, it’s easy to slip up. I’ve learned to keep a pH adjuster on hand at all times, makes it much easier to catch issues early before they snowball.
Related: How to Troubleshoot Common Hydroponic Problems — A quick diagnostic guide for dealing with yellowing leaves, slow growth, and strange root odors.
Frequently Asked Questions
Is hydroponic food safe and organic?
Yes, hydroponic produce is highly clean and safe, containing the exact same minerals as soil crops. Organic hydroponics is possible using refined organic liquid nutrients.
How much water does hydroponics actually save?
Hydroponics recirculates water in closed reservoirs, saving up to 90% more water compared to traditional soil gardening where water drains away into the ground.
Our Amazon Storefront
Browse all our recommended tools & supplies
Everything we personally use and trust — hand-picked for gardeners like you.
I've been running DWC and Kratky systems for several years and write about what actually works, not textbook theory. Follow along for honest product reviews, practical guides, and real grow results.