As an Amazon Associate, I earn from qualifying purchases. Some links in this article are affiliate links, if you buy through them I may earn a small commission at no extra cost to you.
Quick Summary
- Hydroponics Overview: Grow plants without soil using water, mineral nutrients, oxygen, and inert root support.
- System Checklist: Choose between DWC, Kratky, NFT, Ebb & Flow, Drip, or Wick configurations.
- Water Quality: Use filtered water or off-gas municipal chlorine to protect delicate root hair tissue.
- Chemistry Control: Maintain pH between 5.5 and 6.5 and measure electrical conductivity regularly.
- Lighting Strategy: Run full-spectrum grow lights 14 to 16 hours daily to maintain photosynthetic rates.
For the fastest harvest with minimal equipment, start with a Kratky lettuce system. A plastic tote, net pots, basic nutrients, and seeds are all the materials required. In eight years of growing, I rely on this setup for reliable, low-maintenance greens.
This guide covers system mechanics, required hardware, nutrient chemistry, plant selection, and early troubleshooting.
Take a listen to our podcast: The Complete Guide to Hydroponics for Beginners
Review common hydroponic mistakes beginners make to identify and avoid setup errors before planting.
1. What is hydroponics?
Hydroponics delivers dissolved mineral fertilizer directly to plant roots in water. Because roots do not forage through soil for ions, plants channel metabolic energy into vegetative growth, producing yields 20 to 30% faster than soil-grown crops.
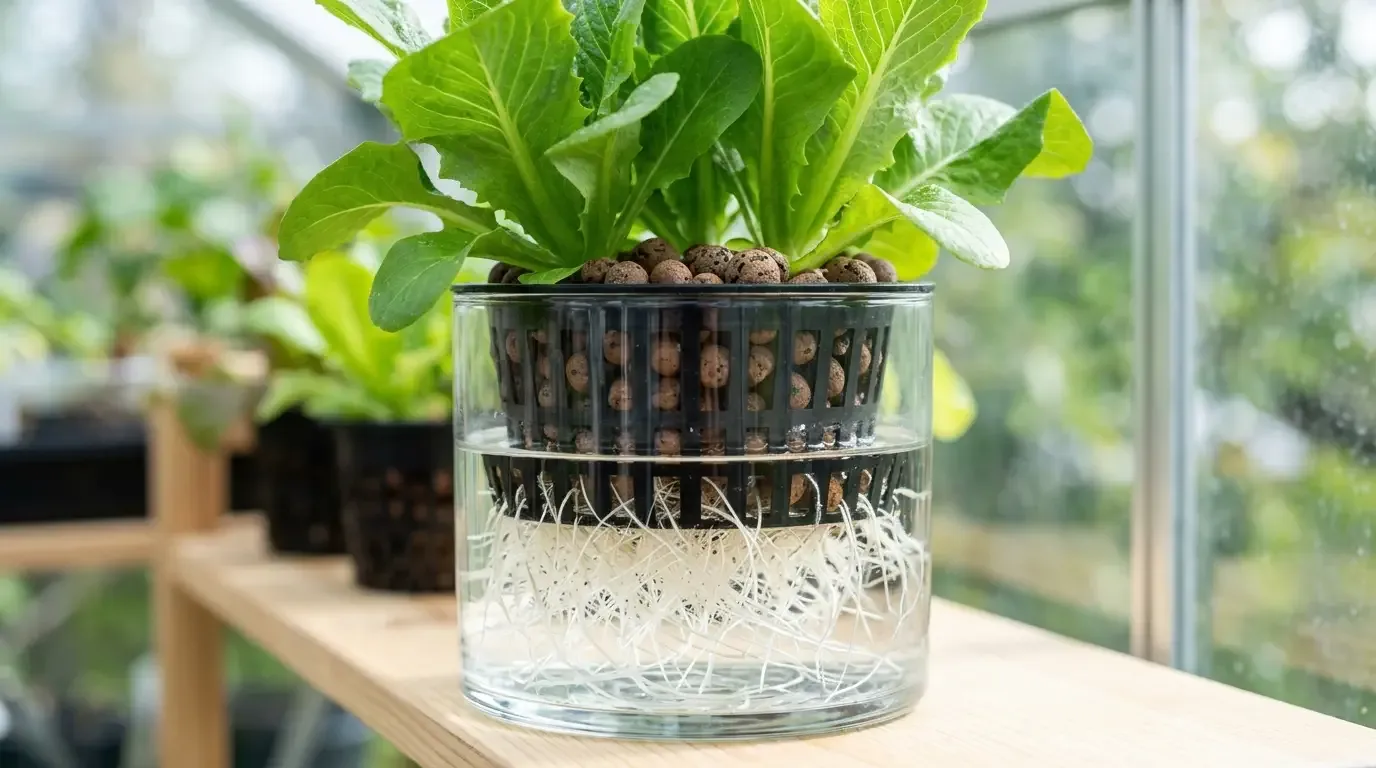
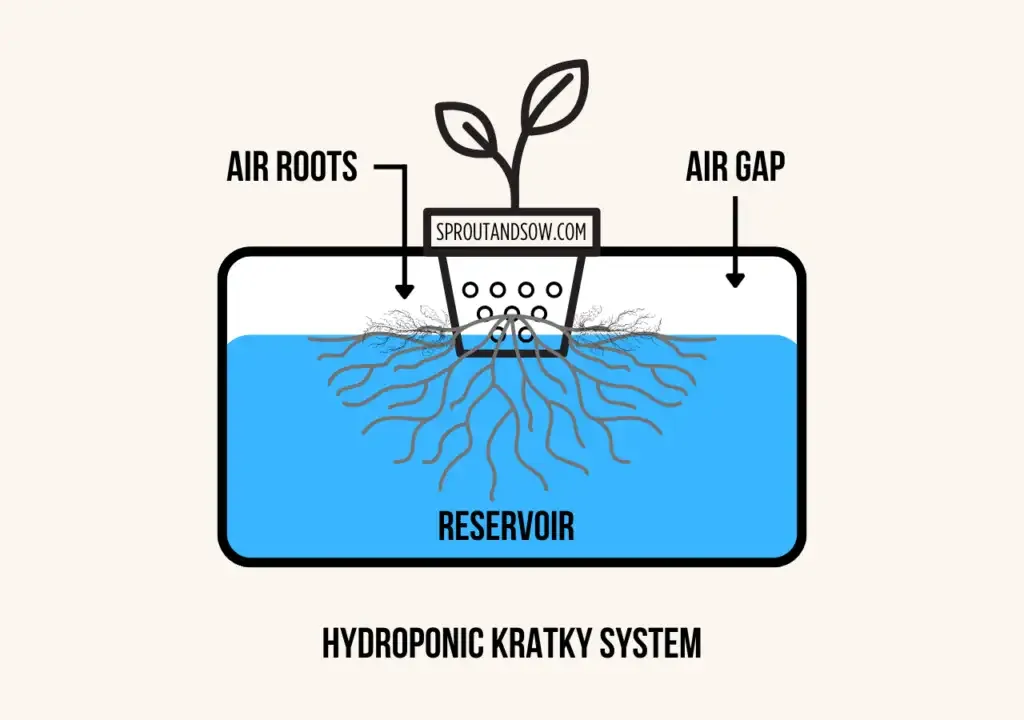
Roots require continuous dissolved oxygen to metabolize nutrients and prevent pathogen proliferation. Active systems pump air through diffusers. The passive Kratky method relies on a permanent air gap between the declining water level and the net pot. This structure forces root systems to develop two functional regions: lower water roots that absorb moisture, and upper adventitious air roots that take in atmospheric oxygen.
Hydroponics scales from single mason jars on windowsills to commercial operations producing metric tonnes of produce. The underlying physiology remains identical.
2. Benefits of hydroponic gardening
Key operational advantages include:
- Water efficiency: Closed-loop reservoirs recirculate water, consuming up to 90% less moisture than ground soil by eliminating deep drainage and field evaporation.
- Growth speed: Direct ionic nutrient delivery accelerates vegetative cycles by 20 to 30%.
- Year-round production: Controlled indoor lighting and climate decouple harvests from outdoor seasonal weather.
- Space density: Vertical channels and tiered racks yield high volume in compact footprints.
- Zero soil pests: Growing without dirt prevents soil-borne fungal pathogens, root nematodes, and grub damage.
3. Types of hydroponic systems
Six primary system designs deliver nutrients and oxygen to plant root zones:
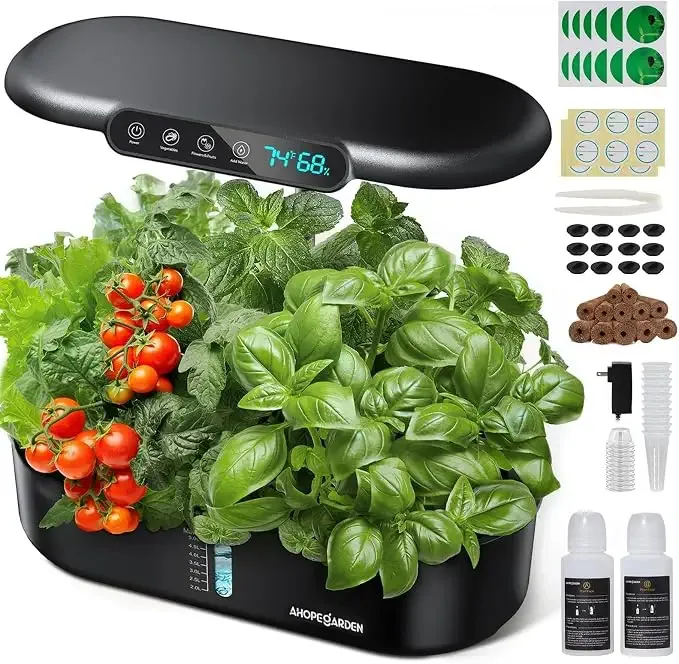
Indoor Garden Hydroponics Growing System
A compact countertop kit complete with growing pods, LED lighting, and an automated circulation pump. Setup takes under 30 minutes, providing a turn-key platform for fresh indoor greens.
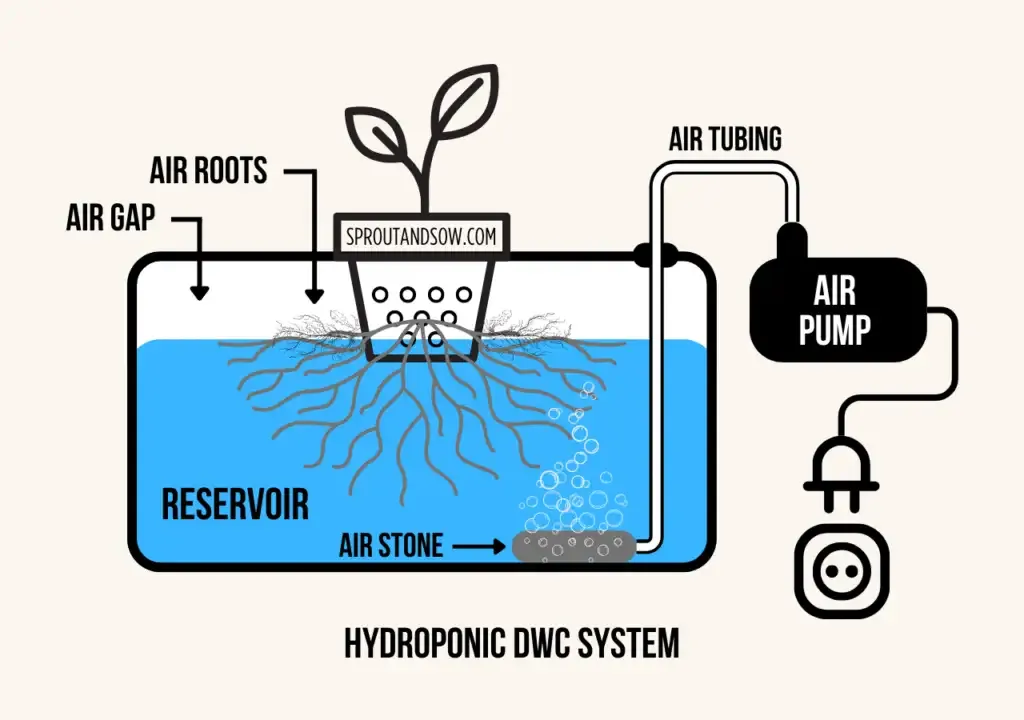
- Deep Water Culture (DWC): Roots suspend from net pots into an aerated reservoir. An electric air pump and porous air stones oxygenate the bath constantly, preventing Pythium root rot. DWC accelerates growth rates and suits high-consumption crops like tomatoes, though power outages can stress roots within hours if aeration stops.
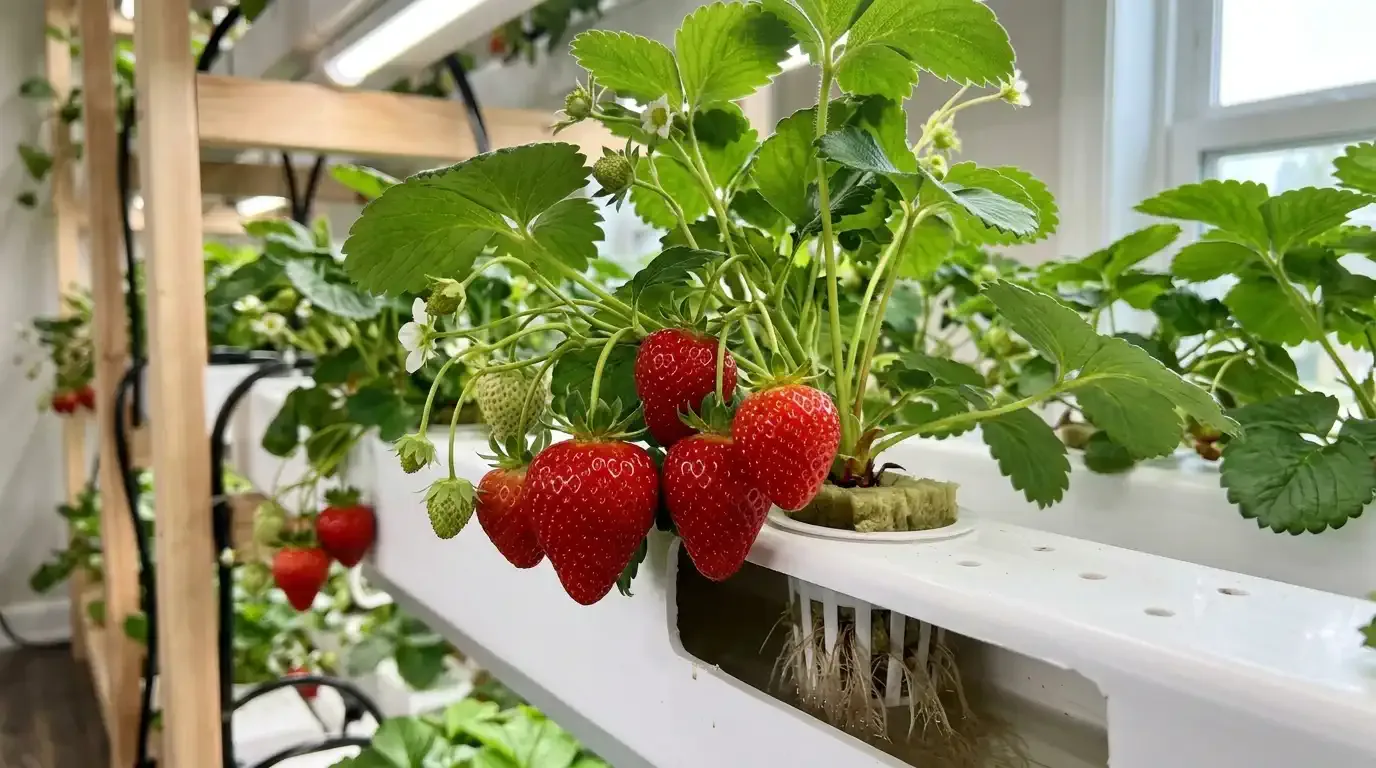
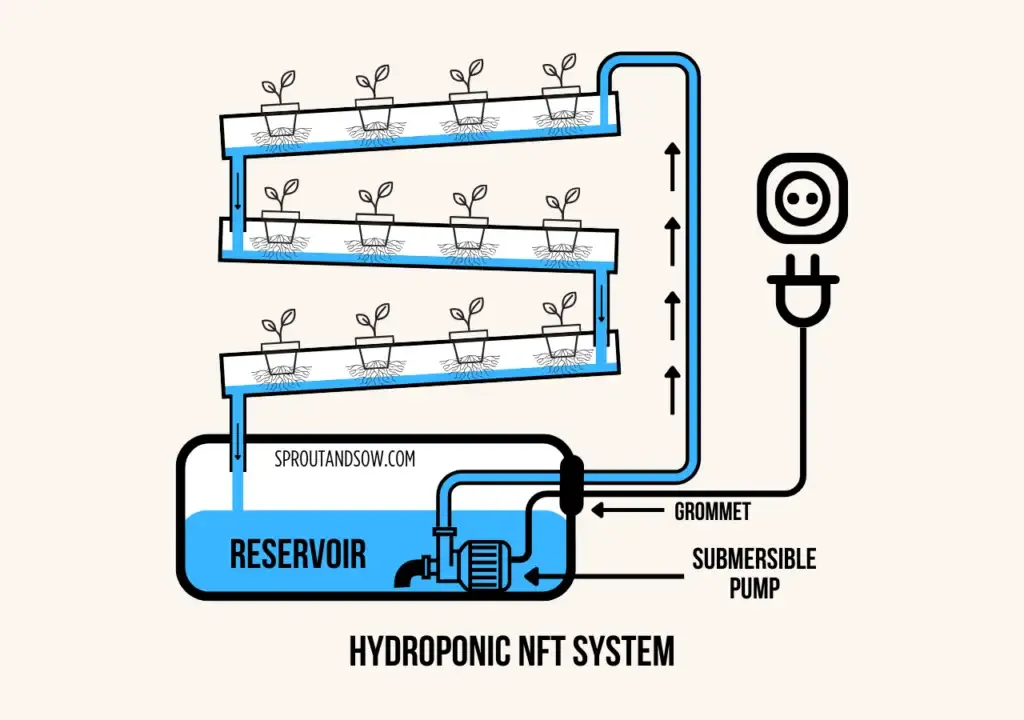
- Nutrient Film Technique (NFT): A continuous, shallow stream of nutrient solution circulates through sloped PVC or food-grade channels. Roots spread along the floor of the channel, drawing nutrients from below and oxygen from the moist channel interior. NFT suits high-density greens, but plumbing clogs or pump failures require rapid intervention.
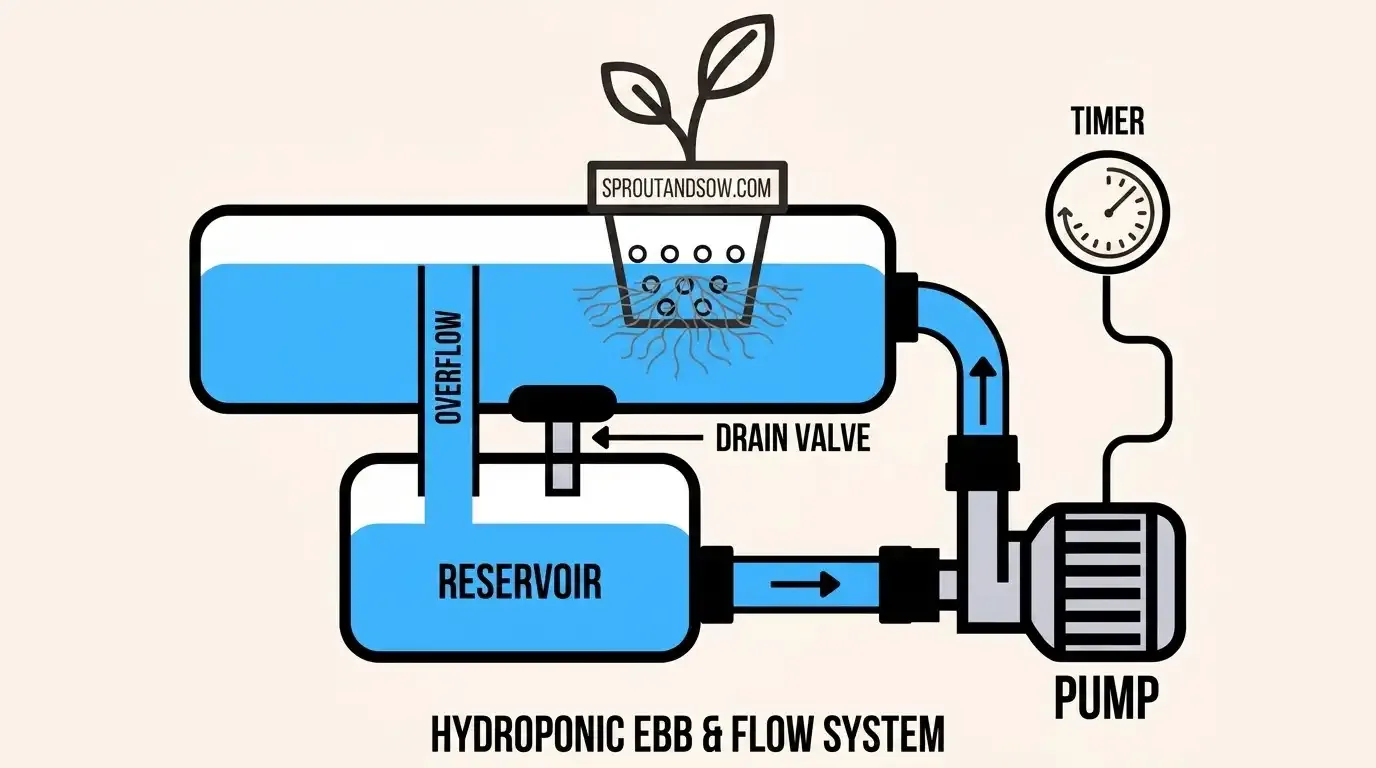
- Ebb and Flow (Flood and Drain): An electric pump floods the root tray with solution on a scheduled timer, then allows it to drain back into a lower reservoir. Plants absorb nutrients during flooding and pull fresh oxygen into media pores during drainage. Read our Ebb and Flow beginner’s guide for reservoir calculations.
- Kratky Method: Plants sit in net pots above a sealed reservoir. As the plant absorbs water, the fluid level recedes, exposing upper roots to humid air inside the container. This passive technique requires no power, air pumps, or timers. It remains the easiest and cheapest hydroponic system you can start today, harvesting lettuce heads in 35 to 45 days from a standard tote.
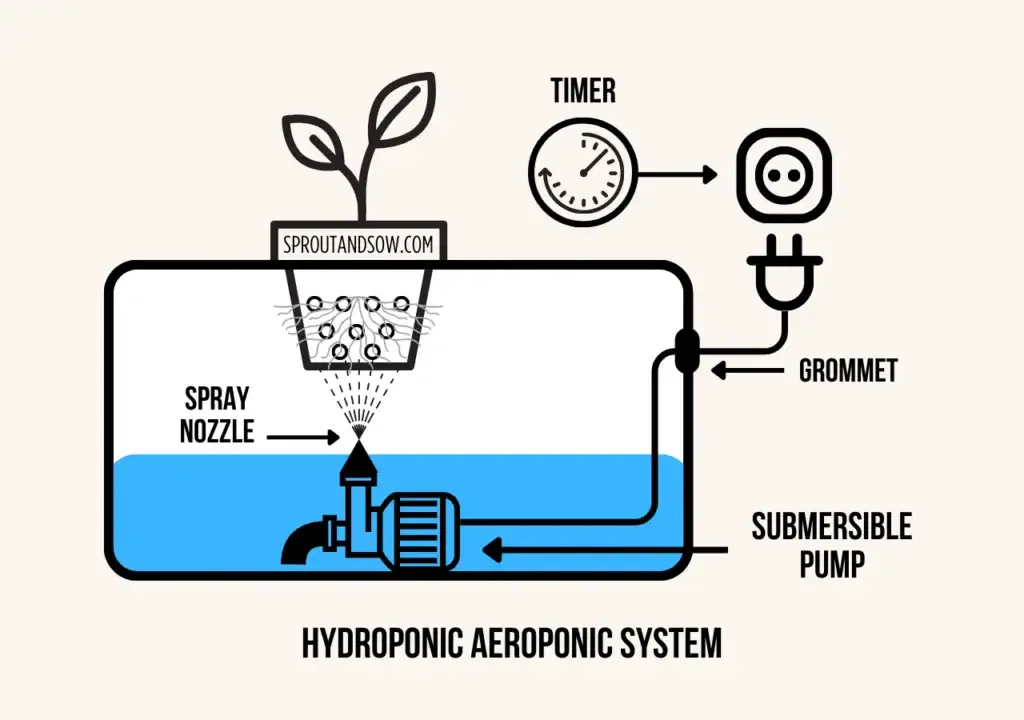
- Aeroponics: Suspended root systems receive periodic bursts of atomized nutrient mist from high-pressure nozzles. Direct oxygen exposure maximizes metabolic activity. Read how aeroponic towers work to inspect vertical pump configurations. Spray nozzles require filtration to prevent particulate clogging.
- Wick System: Inert porous wicks draw solution from a base reservoir into media through capillary action. The passive transfer rate restricts this setup to small, drought-tolerant herbs.
Recommendation: Start with Kratky. It has no moving mechanical components, costs minimal capital to assemble, and demonstrates nutrient dynamics before you invest in active pumps.
4. Setting up your first Kratky system: step by step
Follow these steps to assemble an operational Kratky lettuce reservoir:
Materials Required:
- Opaque plastic storage tote (10 to 20 litres for 4 to 6 plants)
- 5 cm (2-inch) net pots
- Expanded clay pellets (hydroton) or rockwool cubes
- Hydroponic fertilizer concentrate
- Digital pH meter and calibration solution
- pH Up (potassium hydroxide) and pH Down (phosphoric acid)
- Seeds: looseleaf lettuce, spinach, or basil
Step 1: Drill net pot holes in the tote lid. Space openings 15 to 20 cm apart. A 50 mm or 68 mm hole saw cuts clean recesses for standard net pots.
Step 2: Mix the nutrient solution. Fill the tote with water. Add nutrient concentrates according to label directions for leafy crops, aiming for an electrical conductivity (EC) between 1.2 and 1.6 mS/cm.
Step 3: Adjust pH between 5.5 and 6.5. Test the bath with a calibrated digital meter. Add dilute pH Down or pH Up in milliliter increments until the reading stabilizes in the target zone.
Step 4: Establish the initial waterline. Fill the reservoir so the water level contacts the bottom 5 mm of the net pots. As roots descend into the solution, avoid adding water back to the top; maintain the developing air space.
Step 5: Germinate and insert seedlings. Start seeds in pre-soaked rockwool cubes or coco plugs. Once the primary taproot penetrates the base of the plug, place the plug in a net cup and backfill with rinsed clay pellets to block light.
Step 6: Block all light penetration. Light reaching the nutrient bath stimulates rapid algae blooms that exhaust dissolved oxygen and compete for nutrients. Use opaque dark plastic and cover any gaps between net pots with reflective material or clay pebbles.
Step 7: Position under appropriate lighting. Place indoors under LED grow lights running 14 to 16 hours daily, or outdoors beneath 50% shade cloth to shield young foliage from sunscald.
Looseleaf lettuce heads reach full maturity in 30 to 45 days.
5. Hydroponic supplies checklist for beginners
To assemble a resilient garden, reference our breakdown of 10 must-have tools for a successful hydroponic garden alongside this hardware list:
Essential Equipment:
- Opaque reservoir tote: Heavy-duty dark polypropylene container (10 to 20 litres minimum).
- Net cups: 5 cm diameter for salad greens; 8 to 10 cm for heavier brassicas.
- Porous growing media: Kiln-fired expanded clay pebbles or horticultural rockwool.
- Hydroponic fertilizer: Complete two-part or three-part mineral salts with trace micronutrients.
- Digital pH meter: Handheld glass-electrode meter with automatic temperature compensation.
- pH control agents: Food-grade phosphoric acid (pH Down) and potassium hydroxide (pH Up).
- Graduated measuring syringes: For dosing concentrated nutrients.
Active System Hardware (DWC, NFT, Ebb & Flow): 8. Submersible water pump: Rated for your system volume and vertical head height. 9. Diaphragm air pump and air stones: Sized to deliver at least 1 liter per minute per gallon of water. 10. Digital appliance timer: For controlling lighting periods and flood intervals.
Indoor Environment: 11. Full-spectrum LED fixtures: Balanced 4000K–6500K diodes for vegetative growth.
Secondary Diagnostic Tools: 12. EC/TDS conductivity pen: Measures mineral salt density in parts per million or millisiemens. 13. Digital water thermometer: Tracks solution temperature to prevent pathogen outbreaks.
6. Hydroponics lighting requirements
Light intensity and photoperiod dictate photosynthetic production:
LED Panels: Modern diodes provide efficient photon output per watt. Consult our guide on the best LED grow lights for beginners for tested models. For a 60×60 cm (2×2 ft) canopy, a 100W to 150W LED fixture delivers adequate photosynthetically active radiation (PAR) for leafy greens and herbs. For a 120×120 cm (4×4 ft) space, use a 300W to 480W unit. Mount panels 30 to 50 cm above the canopy to avoid thermal stress while preventing stem stretching.
Fluorescent T5 Fixtures: Useful for seedling propagation trays. T5 tubes lack the photon density required for mature fruiting plants.
High-Intensity Discharge (HID): Metal halide and high-pressure sodium fixtures generate substantial heat and require exhaust ducting. LED arrays have largely replaced HID setups in residential rooms due to lower power draw and reduced heat dissipation.
Standard photoperiod schedules:
- Leafy greens and herbs: 14 to 16 hours active illumination, 8 to 10 hours dark.
- Fruiting crops: 16 to 18 hours vegetative cycle, 12 hours dark cycle to initiate flowering.
- Seedling emergence: 18 hours illumination for the initial 14 days.
7. Plant selection for beginner growers
Begin with species that tolerate fluctuating electrical conductivity and moderate temperature shifts. Review our guide on the best hydroponic plants for beginners for profiles on target crops:
Proven beginner crops:
- Lettuce: Reaches harvest size every 5 to 6 weeks. It tolerates minor EC shifts and regrows from basal cuts. Read our complete hydroponic lettuce growing guide.
- Herbs (basil, mint, parsley, cilantro): High market value, compact root zones, and quick vegetative growth. Basil thrives in DWC and Kratky when supplied with warm water (20–24°C).
- Spinach: Fast germination and shallow root depth. Keep nutrient solutions cool to prevent premature bolting.
- Kale and Swiss chard: Robust brassicas that tolerate wider nutrient concentration swings.
- Strawberries: Day-neutral cultivars perform well in horizontal NFT pipes and Dutch buckets.
Crops to avoid during early builds:
- Indeterminate tomatoes and cucumbers: High water intake, heavy nutrient demand, and sprawling vines that demand heavy overhead trellises.
- Root vegetables (carrots, parsnips): Taproots hit reservoir bottoms and deform without specialized deep granular media.
- Large squash and melons: Expansive root masses choke plumbing channels.
8. Managing nutrients and pH levels
Nutrient concentration and hydrogen ion concentration (pH) govern mineral availability:
Nutrient management: Complete hydroponic solutions supply macro elements (N, P, K) and micro elements (Fe, Mn, Zn, B, Cu, Mo). Mix concentrates into water sequentially; never combine undiluted A and B concentrates, or calcium will precipitate out as insoluble calcium sulfate. Start seedlings at 50% strength (0.8–1.0 mS/cm) and increase concentration as foliage expands.
Store mixed reservoirs in light-tight vessels. Ambient light entering the solution spurs unicellular algae growth, depleting oxygen and creating root biofilms.
pH control: Maintain solution pH between 5.5 and 6.5. Leafy greens thrive around 5.8 to 6.2. At pH levels above 6.5, iron, phosphorus, and zinc precipitate into unusable forms. Below 5.5, calcium and magnesium uptake drops. Read our guide on understanding hydroponic pH levels and how to manage them for correction tables.
Testing schedule: Test pH and EC weekly, and test twice weekly during warm summer conditions. Keep solution temperatures between 18°C and 22°C (64°F–72°F) to sustain dissolved oxygen retention.
Managing summer temperatures: Direct solar radiation on plastic totes elevates solution temperature, driving down dissolved oxygen and triggering root necrosis. Shield outdoor reservoirs with 50% aluminized shade cloth or bury containers in ground trenches to stabilize temperatures.
Topping off reservoirs: In Kratky setups, top up with half-strength nutrient solution or plain water as the water level recedes. Keep the water level below the designated air root zone to prevent root suffocation.
9. Troubleshooting common hydroponic problems
For expanded diagnostics, consult our guide on how to troubleshoot common hydroponic problems:
- Yellowing foliage (chlorosis): Yellowing lower leaves points to mobile nitrogen deficiency; increase primary feed strength. Interveinal chlorosis on fresh upper leaves indicates iron deficiency caused by high pH. Correct reservoir pH before adding micronutrient supplements.
- Insect pests: Common indoor pests include aphids, spider mites, and fungus gnats. Treat aphids with potassium silicate sprays or insecticidal soap. Introduce predatory mites (Phytoseiulus persimilis) for two-spotted spider mites. Eliminate fungus gnats by letting the top 2 cm of media dry and installing yellow sticky monitoring cards.
- Pythium root rot: Characterized by dark brown, slimy root mats and hydrogen sulfide odors. Caused by low dissolved oxygen and solution temperatures exceeding 24°C (75°F). Add air stones, lower water temperature, and sanitize affected root mass with 3% horticultural hydrogen peroxide (3 ml per liter of solution).
- Algae formation: Green accumulations along tubing and reservoir walls indicate light leaks. Seal fitting gaps with black vinyl tape. Flush contaminated plumbing with dilute hydrogen peroxide before refilling. Review our complete guide on how to prevent algae growth in your hydroponic system.
- Rainwater intrusion: Heavy rain entering outdoor Kratky totes dilutes nutrient salts and drowns air roots. Anchor lids with rubber gaskets and position totes under transparent roof panels or patio eaves.
10. Long-term operational protocols
Adopt these cultivation habits after establishing your initial system:
- Maintain a reservoir log: Record daily pH, EC readings, ambient temperature, and additions. Historical data isolates contamination events and nutrient lockouts.
- Use larger reservoir volumes: Greater water volume buffers against erratic pH shifts and nutrient consumption spikes. A 50-liter reservoir remains more chemically stable than a 15-liter tote.
- Pre-plan heat mitigation: Install cooling fans or shade structures before summer temperatures peak.
- Engage grower forums: Consult experienced hydroponic communities (such as r/hydro) for local water quality parameters and custom nutrient formulas.
- Expand systematically: Master single-crop Kratky bins before scaling to recirculating NFT or multi-bucket DWC arrays.
FAQs
- Is hydroponics expensive to start?
A basic Kratky lettuce setup costs under $50, requiring a plastic tote, net pots, clay pellets, nutrients, and seed. - Can I grow any plant in hydroponics?
Most crops adapt to hydroponics, but beginners should start with compact leafy greens and culinary herbs before tackling fruiting crops. - How often should I change the water in my hydroponic system?
In active recirculating systems, drain and replace the reservoir solution every 14 to 21 days. In Kratky containers, top up with dilute solution as the level drops. - Can I leave my Kratky system out in the rain?
No. Rainwater dilutes the mineral balance and submerges upper air roots, starving plants of oxygen. Always grow beneath shelter. - Can I use tap water?
Yes, provided you adjust pH to 5.5–6.5. If the tap water contains chlorine, let it sit uncovered for 24 to 48 hours to off-gas before mixing. - How much light do hydroponic plants need?
Leafy greens require 14 to 16 hours daily. Fruiting plants require 16 to 18 hours in vegetative growth and 12 hours during flowering.
Conclusion
The most reliable way to learn hydroponics is to assemble a single Kratky tote, transplant four lettuce seedlings, and monitor water consumption across a 40-day growth cycle. Kratky systems operate without electrical pumps, mechanical timers, or plumbing lines.
Start with leafy greens. Keep a calibrated digital pH meter near the reservoir. Shield outdoor units from rain and direct midday heat. Expand your system once you understand electrical conductivity and root development.
Editor’s Note: Parts of this guide were structured and optimized with the assistance of AI, then thoroughly reviewed, edited and expanded with first-hand growing experience by our author Raymond to ensure practical, real-world accuracy.
Frequently Asked Questions
Is hydroponics expensive to start?
Beginners can start with passive Kratky or basic DWC systems for under $50. A lettuce setup requires a dark plastic tote, net cups, clay pebbles, and mineral nutrients.
Can I grow any plant in hydroponics?
Leafy greens and culinary herbs produce the fastest yields with minimal intervention. Avoid tall indeterminate crops like tomatoes until you install vertical trellising; top-heavy plants tip over without soil support.
How often should I check pH levels in hydroponics?
Check pH weekly, or twice weekly during warm summer periods. High reservoir temperatures accelerate chemical shifts and stress roots.
Can I leave my Kratky system outside in the rain?
No. Rainwater dilutes mineral nutrients and submerges upper air roots. Keep outdoor Kratky systems beneath a roof, shade cloth, or patio cover.
Do hydroponic plants need soil at any stage?
No. Hydroponic plants grow without soil, absorbing dissolved minerals from water. Porous inert media like expanded clay pebbles or rockwool anchor stems inside the net cup.
Can I use tap water in my hydroponic system?
Yes, provided the pH is adjusted between 5.5 and 6.5. If municipal tap water contains chlorine, let it sit uncovered for 24 to 48 hours to off-gas before mixing nutrients.
How much light do hydroponic plants need?
Provide 14 to 16 hours daily for leafy greens and herbs. Fruiting crops require 16 to 18 hours during vegetative growth and 12 hours during flowering. Full-spectrum LED panels hung 30 to 60 cm above the canopy supply sufficient photons.
Our Amazon Storefront
Browse all our recommended tools & supplies
Everything we personally use and trust, hand-picked for gardeners like you.

I've been running DWC and Kratky systems for several years and write about what actually works, not textbook theory. Follow along for honest product reviews, practical guides and real grow results.